Like Facebook says it, “Over 1 billion people. We’ll help you reach the right ones.”
The ultimate goal for any marketer/business owner is to convert his leads into customers. However, for leads to convert, you need to get hold of them first, right? Running ads on social media biggie, Facebook is a time tested approach to grab attention and get more leads for your business.
There are multiple ways to run ads/promoted posts on Facebook. Today, I will discuss how to create Facebook ads in 8 simple steps. Let us take the example of a GATE coaching institute trying to capture student leads through Facebook. For those of you who don’t know, GATE stands for Graduate Aptitude Test in Engineering, and is an all India examination for Engineering in MSc, MTech and PhD programmes. (This article is relevant for Facebook beginners).
Here is how to create Facebook ads
Step 1 – Logging into Facebook
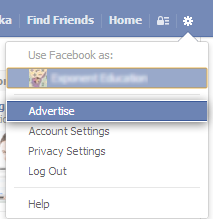
Log into your Facebook account using your personal or business profile and go to the ‘Advertise’ page. You will get this in the drop down menu next to the settings button on your home page.
Step 2 – Start Creating Your Ad
You will be led to this page as shown below. Click on the ‘Create an Ad’ tab to begin the process of creating an ad for Facebook.

Step 3 – Select Facebook Page/Landing Page to Promote
You will be asked to enter a URL, destination name or a destination ID that you want to place the ad for. Now, in this step, there are two ways in which you can create your ad:
1. Enter a page URL which is already there on Facebook
2. Enter an external URL
In the first instance, you choose the place, page, app or event that you would like to promote. For example: Here we are advertising a page which is dedicated toward GATE coaching. Check out how you can create a Facebook Landing Page for lead capture.

OR
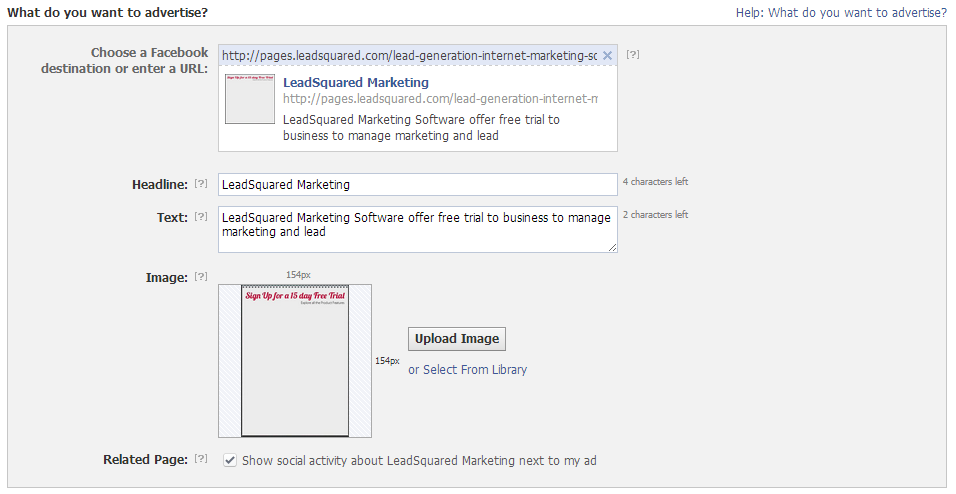
In the second instance, if you enter an external URL (like in the image shown below I have placed the URL of the lead capture page for LeadSquared’s 15 day trial) you will be directly lead to designing your headline, the ad copy and image.
In short, when you place an external URL, you jump Step 4 and move straight to Step 5.
Step 4 – Set the Ad Objective
Your next step is named, ‘What would you like to do?’
1. Get more page likes: Drive more Facebook users to your ad/page.
2. Promote page posts: Promote a particular post out of all the posts that you have made on your page, ex. a blog post, picture etc. This will not only enhance your reach, but also your chances to be placed in news feeds – the center column of your home page.
3. See advanced options: Drive traffic to your website. You can configure your advanced creative and pricing options. This is so intricate that you can also bid for the number of clicks on a particular post. (Remember, each category is different and offers different features to help you target your audience better.)
Since our main goal here is to collect leads and get better control over our ads, we will opt for the ‘See Advanced Options’.

Step 5 – Create the Ad copy
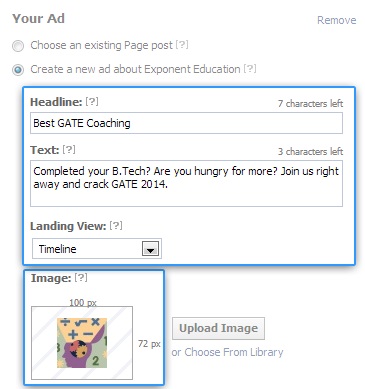
You begin designing ‘Your ad’ here. FB ads are simple, comprising 25 character headline and a 90 character description. You can also add a thumbnail photograph measuring 100 pixels x 72 pixels here. Make sure to keep it very relevant for your audience. For instance, if you are a GATE institute, this would be a good ad copy:
Looking for Best Coaching for GATE? Join Now – 1 Week Free Trial Period!
You can then set the landing page of the ad. For instance, you can choose to land the visitors on your Facebook Page’s timeline, or a lead capture page (when you are aiming at lead capture, it is recommended that you set a landing page, instead of directing people to the timeline). Here’s how you can create one and the image on your right shows how your ad will look.
*Do go through these guidelines before you create your ad copy.*
Step 6 – Choose your Audience
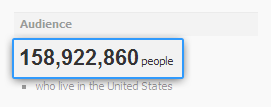
Next, you narrow down your target audience under the ‘Choose your audience’ category. Before we begin, in the image shown below, see the number of people under ‘Audience’ section before the filters have been set.
This is the most important step, as this is where you choose your perfect target.
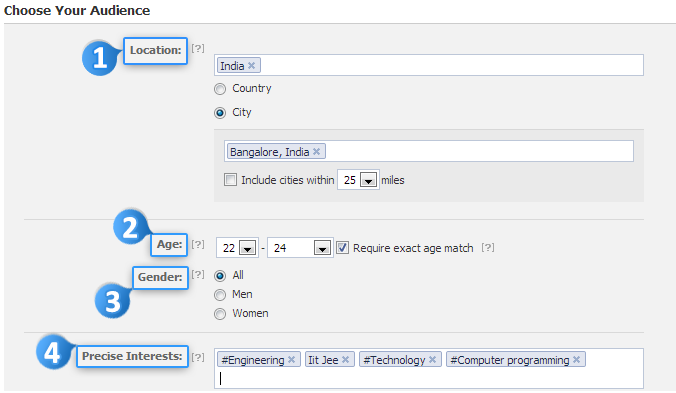
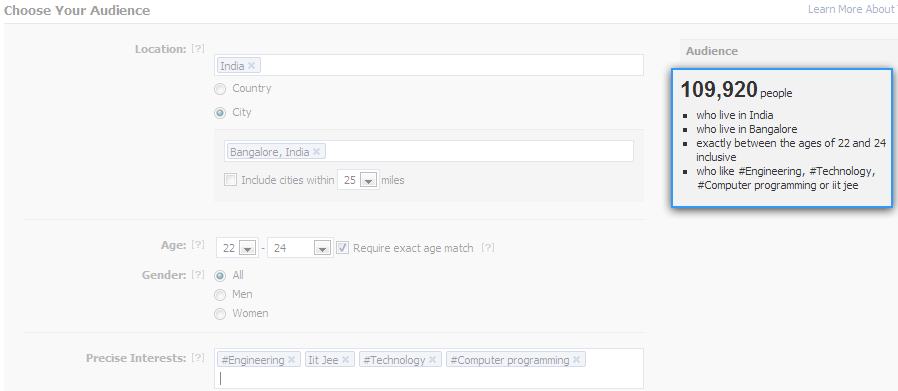
1. Location: You can micro target by location (state/city/zip code). Ex: Students on Facebook giving GATE ‘14 exams will be India specific only. If you are a physical institute based in Bangalore, you might want to choose by city: Bangalore, Nelamangala, Hosur etc.
2. Age: You can also target by age. Ex: GATE will mostly include students who have completed/ pursuing their B.Tech – 22-24 years.
3. Gender: You can also choose gender, based on the kind of ad you are advertising. Here, since we are talking about exam specific ads, gender will be categorized as ‘All’.
4. Precise Interests: Under the ‘Precise Interests’ section, you can choose interests that you are looking for in your target audience. In this case, your interests can be Engineering, IIT, studies etc. Once you have entered precise interest, you don’t have to choose the broader interest.
If you have opted for the ‘Advanced options’ under the ad category, you can also detail down to relationship status, languages spoken, college attended and workplace. By the process of trial and error, you can boil down your audience from a whopping 167 million users in the US to as few as 1 lakh people in India or a particular city.
Now, take a look at the image shown below which shows the targeted audience once the filters have been set.
Step 7 – Campaign Pricing and Schedule Options
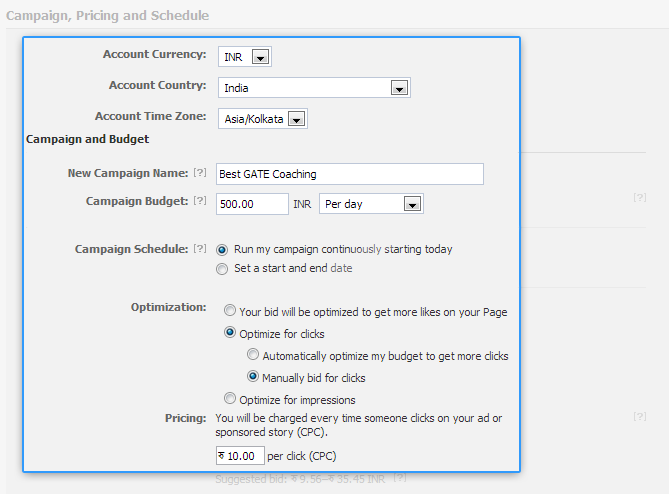
This step is ‘Campaign, Pricing and Schedule’ for your Facebook ad.
1. Choose the currency, country and time zone in which you are placing your ad.
2. The ‘New Campaign Name’ should be distinct and definite.
3. Next, choose how much you are willing to spend for your ad campaign. You can choose from a daily budget or a lump sum amount that you will spend for as long as the ad runs. (Payments on Facebook are either pay-per-click – you pay every time someone clicks your ad or per thousand impressions – you pay every time 1000 people see your ad.) We have opted for the Pay-per-click payment service.
Step 8 – Review your Ad
Once you ‘Review your ad’, you will be able to see the details of your ads that you have fed and how your ad will look. Next, you will be prompted to make payments for your ad. You can use a credit/debit card, PayPal or Facebook ad coupon.

Facebook will hold your ad for review for a minimum of 24 hours. Your ad will either appear in news feeds or in the right column of any page in search results.Later, you can use the ‘Ads Manager tool’ to keep track of your ads’ progress.
So, this is how to create a Facebook ad: Basic News-feed ad. Be creative, think outside the box and you are good to go. For further queries, please do visit Facebook’s Help Centre or leave us a comment and we will get back to you ASAP.
Add custom tabs on your Facebook pages that link to LeadSquared’s landing pages here.
